Friday 12 December 2008

Silverlight Media Canvas - my knockoff of the Surface Scatterview


If any of you have played on the surface or even had chance to use the SDK you will know about the Scatterview control, it powers the awesome way Surface handles the photo and image controls. So I modified the controls I used on my site to make a simple photo viewer using it. You can move images around, resize and rotate them, and soon will be used in my very own 'Surface on the cheap' - all you need is a webcam, projector and some free time.

Tuesday 11 November 2008

User Experience in Web 2.0 – Make your own news Cloud

The internet has come a long way from its humble beginnings and so has my website. In this article I will be talking about some of the technologies that are emerging on the internet, how website design and user experience go hand in hand and then talk about how I went about implementing the framework used in my website; http://www.mrpfister.co.uk/ and how you can make your own News Cloud using its technology.
Originally virtually all websites are just text derived from HTML developed by Tim Berners-Lee in 1980, and then along came additions to the original HTML; images, tables, formatting and then eventually style sheets. This meant that a webpage could look good however it was still only displaying static information that would only change once the webpage was reloaded.
Eventually this all changed with AJAX (asynchronous JavaScript and XML), allowing web pages to dynamically load content and ushered in Web 2.0 where programmers and web designers were free to start pushing sites to the limits of their imaginations, rather than the technical limits that prevailed.

Moving on to more recently Microsoft unveiled Silverlight; a framework to create rich online interactive experiences that tied in using the software plus services mentality to the desktop superset; Windows Presentation Foundation. One of the most predominant features of Silverlight is Deep Zoom which allows zooming in on ultra hi-res images; up to 1 billion pixels worth! The most incredible example of this can be found at the Hard Rock Cafe’s Memorabilia website - http://memorabilia.hardrock.com/

With the increase in the graphical nature of the content found on the internet – made possible partly due to tools like Silverlight and also due to the huge increase in bandwidth available to broadband customers, user experience now plays an important role in website design. It is no longer the case to have a web presence, but now it has to entertain and interest those that use the site and maintain their interest so they don’t deviate elsewhere. This brings us to user experience, it is not just the content of the website that will interest those that view the site but the way it is presented as well.

Therefore with the release of Silverlight 2, I decided to redesign my website, I wanted it to be different to virtually anything else I had seen online; so taking inspiration from Microsoft Surface and Project Mojave I created a tactile, interactive website where it takes the analogy of digging up information one step further. There is only one page to the site, however to explore more information you fly through the site going deeper and uncovering more information and eventually reaching a game.

Technically it works by extending the canvas control by creating a new control type that inherits from the Canvas type. The new control hooks mouse inputs from the Silverlight control to track whether each of the controls is being moved, resized or rotated. Whenever the mouse wheel is scrolled the cloud is re-rendered; entailing each of the controls to scale respective of their depth.
To show other uses for the display framework my site uses I have created a sample project you can take away and tinker with. The application loads a RSS feed and renders it to the cloud, so you can fly through and read the headlines you are interested in; it’s a quirky way to read the news. The project itself is written in C#. (Download Link to follow shortly)

Windows 7... All hail the king

In January 2007 Microsoft released Windows Vista, only to be met with mixed reviews when compared to the king of operating systems at the time; Windows XP.

For the regular user, Vista added only ‘shine’ to the Windows experience at the cost of performance, start up time and memory usage –since its launch most of these problems have been fixed or their impacts reduced through a magnitude of updates yet the underlying concerns remained.

On the other hand for the technical audience Vista was a great breakthrough; the introduction of the Windows Presentation Foundation for improved desktop application composition, better 64bit support, and stronger security yet again these improvements faded as some of these functionalities were bridged across back to XP. Now for some power users such as myself; we use Server 2008 as our desktops, effectively turning it into a workstation powerhouse –clear of the clutter of unneeded applications, unparalleled performance and reliability matched with improved security and usability, this was what we and most people wanted from Vista.

-Thankfully it seems our minority have been noticed when designing the next version of Windows.

Recently at Microsoft’s Professional Developers Conference over in the US Microsoft showed off early pre-beta versions of Windows 7 – the next version of Windows after Vista to much rejoice and excitement. At first glance not too much looks different but when we go under the hood do things get exciting – Microsoft won’t be rewriting Vista into Windows 7, only refining it and trimming the fat.


The desktop remains and so do the common things you would expect; the start menu, the taskbar and system tray yet each has been refined on user’s experiences of Vista.

Now these changes coming to Windows 7 are being built on everyday; not all of the functionality is present at the moment but they hopefully will be there eventually. When I say they are getting built on everyday; I mean quite literally –they compile and build a version of Windows everyday for testing and verification in one of many of their build labs...


Big changes are coming to the taskbar; the text for applications docked in it has been removed to be replaced by a better thumbnail rendering system which hopefully will remove problems when large numbers of windows are open – the usual amount of windows open averages between 6 to 9 at any one time for most people.


In terms of installed applications, Windows 7 will be light on the ground, with more services being able to be downloaded or run directly from the cloud. This means less clutter for users and less unneeded applications, but do not fear, our faithful friend – Windows Paint remains and thankfully updated at last, taking a leaf from the Office Ribbon interface.

Now Microsoft got a lot of grief about performance, and they have listened; Windows 7 is designed to be faster and more efficient with memory than Vista. Being based on Vista as well problems with device compatibility should be minimised.

If you are interested in learning more about the technical internals of Windows 7 and how it’s getting developed I think the best place to go at the moment is the Engineering Windows 7 Blog
Although this was only a developer Pre-Beta tester... or even teaser, it lays down the concepts for the things to come and I like many stand watchful over the future successor to Vista; the King is dead, long live the king!


Tuesday 7 October 2008

My website is online!

http://www.mrpfister.co.uk/ is now online so go check it out, over time I shall add more content and finish off the game. Yes there is even a game hiden slightly away so go explore!

Creating my new website

Well I thought it was about time to create myself a new website, so I went out and got myself http://www.mrpfister.co.uk/ which I thought was rather catchy, and now I am designing it. It will be built nearly completely in Silverlight and do as much fancy stuff as I can and some really cool stuff I'm working on, its interface will be very tactile and pushing the Web 2.0 a bit further. If you have ever played with Microsoft Surface you will feel right at home. Here's a little taste of whats to come, completely manipulable images that can be moved, resized, rotated that will become containers for the content pieces on the site. So you can expand what you want and hide away what you find dull.

More is to come!

My Pictures 3D Helix using WPF (Part 3 of 3)

We now enter the final part of coding a 3D My Pictures Helix using the Windows Presentation Foundation, we’ve done quite a lot and covered quite a few key areas but still have some important areas to cover: optimising memory usage, camera positioning and hit testing. Soon you will have your very own program to impress your friends.

So last time we finally got round to adding some 3D functionality into the application in the form of an actual spiral and I gave a flavour of what was to come on my blog http://blogplusequals.blogspot.com/. However there is a still lot to do, starting with changing the way images are loaded into the application for the image brush. Currently we load in the entire image for the image brush, which is hugely expensive in terms of memory requirements if the images are that taken even by a regular camera. Another big feature we need to add is the ability to navigate the helix in order to view all the pictures on it.

So why is the current method of content loading so bad – creating an imagebrush directly from an image? It loads the entire image into memory, as if we were to use it directly without scaling, which is very inefficient as we are using a reduced size thumbnail in the helix. Therefore we should instead preload the image and create a thumbnail from it that we can use instead; thus saving us considerable amounts of memory while also speeding up the rendering times. Let’s get started then! Go to the CreateHelix() function and replace the texture loading code as follows:


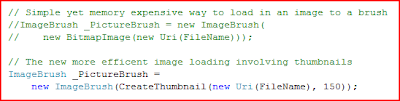
Now the fancy stuff actually takes place in the function CreateThumbnail, in that function it loads the original image, resizes it and returns the new smaller image with a overall reduced memory requirement.


When the application loads it now creates thumbnails however we still have a problem. The program is constantly busy loading the images and may not respond to system events, now in a normal C# application you could use System.DoEvents() however that’s missing in WPF so we can create our own substitute to help combat this issue and to allow the application to remain responsive.


Add the above using statements so we can use the Threading functionality, and then anywhere in the class add the following function to act like the missing DoEvents()... Now please don’t complain at me, I’d rather not want to get lots of emails about how it doesn’t exactly work like DoEvents() or how really we shouldn’t even need it in WPF, I’m just adding in the functionality to provide a simple, easy to understand fix to the problem.


The first place we can add this is to the image loading loop, partly to make it more responsive to system input and also it then creates the effect of the helix filling up as the images are loaded. Just before the Catch statement near the end of CreateHelix you can add a call to DoEvents()


So now we have all the code needed to create the helix, but the images are quite small so we want to display them larger using the code we implemented in the first article, so now we have to add code to make the surfaces respond.
Firstly in order to do this we create a dictionary to bind the surfaces geometry to the filename of the picture it is showing, in the classes declarations add the following.


Adding an entry to the dictionary is very simple and is done in the CreateTexturedTriangleModel function (remember we had one of the arguments being the pictures filename), we need to place the code near the end of the function right after we declare the GeometryModel3D.


Now whenever we perform a lookup in the dictionary for the GeometryModel3D we will be returned with the filename of the picture it was showing.
Inorder to work out when you click which image you were actually clicking we have to write the code to perform a hit test on the GeometryModel, therefore we need to start off by adding an event handler for the Window_MouseLeftButtonUp event.


To perform a hit test we have to get the mouse position and then using the VisualTreeHelper we construct a HitTest function to go through the surfaces and see if any have been hit by the mouse, if so return their GeometryModel (from which we get the pictures filename using the dictionary).


We start with in the code above getting the position of the mouse and creating a 3D point version of it using 0 as the Z value, we then move through to 10 as the Z value and perform the HitTest in between. The HitTest itself is performed on mainViewport and the resultCallBack function of VisualTreeHelper.HitTest we use is called HTResult, which we shall program shortly.
The hit test callback value is a function that is called if there is a result, if it has hit something we then check if its hit a surface(GeometryModel3D) and then we can do something with the result(Display the image)


So when we have called a hit test and it is successful we now need to write the code to display a large image of a picture. We can use the DisplayImage function we made in the first article for this, replace the Do actions... comment in the previous piece of code with the following to display a full window preview of the image that is being clicked on.


This handles clicking on a surface and displaying a large preview but doesn’t handle when we then click on the preview afterwards to close it. For this we have to add some more code to the start of Window_MouseLeftButtonUp which will detect if the preview window is visible and if so fade it out for 500 milliseconds.


At this point we now have the helix and large image previews when we click on a surface, all we have to do now is add the rotation functionality. The rotation will be controlled by three buttons on the form; Rotate Left, Stop and Rotate Right, I will be using the standard button controls for this but you could use something more fancy; such as using Expression Blend to create movie style controls. A great source of inspiration would be the button gallery example project in Expression Blend 2, however explaining how to make WPF controls would take an entire article so go explore!
Back to the xaml designer now where we add each of the three buttons.


The buttons are centred at the bottom of the window and each have a glow effect to make them slightly more interesting. Each of the buttons have their own click events which we will handle in the C# Code. In the code to make it more readable we will use an enumeration to abstract the directions so the code will be easier to read.


Insert the above code in the class declarations, setting by default the rotation to be stationary so the helix won’t automatically start when we load the application.
The rotation could be done by multiple different means, now usually this could be done by an animation but I wanted to be slightly different, I will use a render loop (bit like what you would see in a game) to move the camera around so I can talk a bit more about threading in WPF. To start off with we need to create the Render loop and call it once everything has loaded in the classes constructor. For this we can create a new function called MainLoop() and call it from the constructor.


We now need to start programming the Main Loop. We need it to store the start time of the frame so we can work out the virtual time the frame took to render (so that the rotation remains smooth) and also we use an external Boolean that we tie into the Window_Closing() event. This is so that the render loop stops when we close the form, otherwise it may continue the thread even after we close the form, which isn’t good.


To move the camera we are going to create a helper function that will when given an angle, it will move the camera around the helix to that point. We’ll need a variable in the MainLoop to store the current angle of the camera but also we will have to add a class variable to store the maximum angle that the helix produced (so we don’t rotate any further).


We’ll use a new class variable variable MaxCameraAngle to store the maximum rotation, this will get assigned to at the very end of CreateHelix before it returns, the value that is assigned to it will be value of RotationAngle; a locally defined double variable that stored the Angle of the pictures as they were added.


Finally we can now go back to Mainloop and add the camera controlling code. Firstly define a local double CameraAngle at the top of the function which will keep track of where the camera is and then add the following code to the main loop where comment ‘Rotation update code goes here’ resides.
Now for just one final thing, before we call CreateHelix in the class constructor add a call to MoveCamera with the angle 0. This will reset it ready for us to use.


Now there we have it, a fully functional application. Run it and see for yourself!


Now there are lots of things you can do to add to this, replacing the buttons being one thing, possibly automating the rotation and creating a screensaver could be another. Well I hope you have enjoyed this coding fest, tune in next time for some more interesting coding projects or visit my blog at http://blogplusequals.blogspot.com/

Wednesday 17 September 2008

My Pictures 3D Helix using WPF (Part 2 of 3)

My Pictures 3D Helix using WPF (Part 2 of 3)
Writing computer code is a funny thing really. You can always tell if you have just written bad code, especially so here at Microsoft. For if an architect sees it, normally they will pull a face as if you have just slapped them around the face with your laptop, however you also notice when you write good code for how elegant a solution it seems, so read the article below and judge for yourself.


In the last article, we started laying the groundwork for our My Pictures 3D helix by storing a list of all the pictures, writing some xaml and displaying an image with a fade in effect as well as a border. This time we are moving on to discovering the 3D power of WPF, and how we can utilise it within our project.


If you have never done 3D coding before or not used to the maths behind it then some of the topics covered may seem a bit advanced, so a few blog posts you could look into would be Daniel Lehenbauer discussing 3D texturing (http://blogs.msdn.com/danlehen/archive/2005/11/06/489627.aspx) and Mike Hodnick giving another example of how to create 3D shapes in WPF (http://www.kindohm.com/technical/WPF3DTutorial.htm)


So what do we need to do? Well we need to load the images as a brush, create curved images in the shape of a spiral and have a camera pointing at it as well as a light so we can see the 3D structure... easy!
To start with, we can create the camera element in xaml, which we then alter in the C# code at runtime, so load up the project and add the following code to the Grid control before the border control, if you do it after the border control, it will make some weird effects later!


What the code above does is creates a 3D Viewport on which we can add all our 3D objects, having the ClipToBounds set to true means it will automatically resize to fill the screen. Inside the viewport there is a PerspectiveCamera with some default settings to handle how the camera itself is displayed including a default position and look direction. To light the model we have added an ambient white light
We now want to set a few Constants to control the look and feel of the helix.


Place the above code at the top of the class along with the few other variables we declared in the last article to hold file extensions and the pictures file names.
Now lets start writing the quite epic code to create the spiral, first off we need to create a new function, I called mine CreateHelix.


Inside this function we are going to go through all the filenames we extracted and see if we can load them while spiralling round, so we need to add a variable to store the current rotation around the helix as well as adding the loop. We use a try, catch statement so the program will not crash if it tries to use an image that is corrupt or invalid.


We aren’t actually going to put anything in the catch statement as we aren’t dependent on the try being successful but it is required anyway.
So how are we going to display the images anyway? Well it’s actually annoyingly complicated for what we want to do; but in the end it creates we want. Firstly, we have to create an image brush and load it with one of the pictures we are loading from My Pictures, then create the curved surface using many segments made from triangles and then paint the surface with the image brush.
So let us start and construct the Image brush that we will be using.


For the time being we load the entire image into the image brush, which already can cause some problems as the image size of the pictures; especially if they are taken by a digital camera, are a lot larger than we need, yet for the time being we shall use this method out of simplicity. Once the image brush is created we alter some of its rendering options to increase the performance, this mainly focuses around caching the images and using a faster scaling method when rendering the image to the screen. Finally we have to set the ViewportUnits to absolute otherwise when we come to paint the triangles it won’t work.
Now we calculate a few lookup values focusing on how it fits around the helix; such as its relative width and how many segments it covers.


Now let the 3D begin! We’ll now after that piece of code have to write the code to group all the triangles together into a 3D model, and then add it to a visual model that we finally add to the viewport, so we have to create the model, add the triangles to it and then render it. Here is the outline of the code to do this. Once this is done, we need to progress the rotation counter (RotationAngle) with how much the picture covered as well as the divider.


Hopefully that seems quite straight forward though what goes inside the for loop is the more complicated part.
Diving to the triangle creation logic we again do a bit of pre-computing some values to make life easier for us. Afterwards we declare 4 points which are the corners of the segment; each segment itself being made out of 2 triangles. The segments take into account the rotation and climb of the helix so there’s quite a lot going into making their values. To use the Point3D type we have to import the Media3D namespace by adding it to the imports at the top of the file.


So now in the triangle creation logic (inside the for loop) place the following code.


Now we know the corner points of the segment we can now make the triangles inside it though we actually have to make 4 triangles rather than two due to the way that WPF renders triangles. As WPF only renders triangles that have their normal visible to the viewport, when the surface rotates around it’s no longer visible as nothing is rendered on its reverse. To solve this we have another set of triangles with the reverse normal to represent the back of the pictures so the pictures themselves are always visible as they rotate around the helix.
Its now time to write some helper functions in order to be able to create the triangle meshes, firstly we will need one to calculate the normal of the triangle points, and then another to actually create the mesh and return it to the triangle creation loop that we just worked out the points for.
To create the normal for the triangle we can use the following function.


Don’t worry about the code, regrettably I haven’t got enough space to write a maths tutorial so trust me it just works. Now that’s in place here is the code for the function we are going to use to make the triangle.


I’ve added to the functions arguments a string to pass the filename of the image that the triangle will be displayed. This is so later on we can use it to work out which picture is which when we handle a click event on the window. Again hopefully the code is easy enough to understand but trust me it works.
Now back again to the triangle creation loop after we work out the PicturePoints and now we can add the code to call the CreateTexturedTriangleModel function so we can finally create the triangles.


So all the code to create the spiral is complete but all we have to do is call it! Go to the constructor and remove the reference to DisplayImage and replace it with:


I wouldn’t suggest you running the application unless you only have a few pictures as otherwise the memory requirements will go through the roof. Tune in next time for when I show you how to counteract this by using thumbnails and also getting the helix to rotate and finally put back in the large image viewing functionality we made in the first article. If you do run the program however you should end up with something like this.


Wednesday 27 August 2008

Say Goodbye to Laser... whats to come?


Now I remember when I got my first Optical Mouse, and the difference between that an the conventional ball mouse was incredible, afterwards the jump from Optical to Laser was another progressive step towards mouse nivana... however now Microsoft is at it again with a teaser just saying 'Say Goodbye to laser' with a date. Now I can't wait to see what technology they have thought of, should be interesting to say the least.

Tuesday 26 August 2008

Photosynth Test - My Kona Stinky

Well as I said I would test out Photosynth and so today I spent some time taking some pictures of my bike and then uploaded them to Photosynth, so if you want to see it in action then follow this link.

Photosynth has been released

Photosynth, the 3d Imaging tool by Microsoft Live Labs has now came out of its technical preview and is available to all, so go try it out and create your own synths as they call them. Expect to see a synth of my shiny new Kona soon...

Thursday 14 August 2008

Visual Studio 2008 SP1

Well we all have been waiting a long time for it and finally it is here; Visual Studio 2008 SP1. With many improvements and some new features it seems to be more than just a service pack but an evolution to your coding experience.

Some of the big improvements I should mention are those around the .Net framework and how WPF applications see a significant performance increase (~30%!!) Also the footprint for some applications will be reduced with the introduction of Profiles that will remove any excess .Net functionality that isn't needed.

Finally WPF will also see the introduction of a web browser control however it is handle based from a standard browser control and thus doesn't yet support some of the WPF goodies... how cool would it be to do 3D transformations to a webpage!

Monday 11 August 2008

New Bike!


Well today I purchased my shiny new bike (though have to wait 2 weeks till I can use it, seeing as I'm in York for most of the time till then). Its a 2008 Kona Stinky and its awesome, though now I have no money.

Friday 8 August 2008

Apple's working culture

Working at Microsoft I have to say that it is one of the nicest working experiences I have ever had, so it made me laugh when I read about Apple effectively creating a slave labour culture amongst its employees. What Apple's been doing has been reclassifying some of its technical employee's so they don't have to pay them extra or even give them even a meal allowance. Hmm... has slave labour gone into making your pretty iPhone?

Thursday 7 August 2008

Wubi Wooes on Hardy Heron for my Macbook

I like to try out new things on my Macbook, its my test machine really. My main PC happily runs Server 2008 and does everything I need it too however I like to have fun on my Macbook. To start off with Its running OSX 10 and Vista via Bootcamp, although I shall install Server 2008 next time on it, but I wanted to try out Ubuntu on it as well because it doesn't work on my main pc due to the RAID configuration. (It runs and hides when it notices the six hdd's but I think it just doesn't recognise the chipset; which to be honest Vista didn't as well)

So I installed Hardy Heron via Wubi (though wanted to try the new 8.10 version but it complained when installing), however as the bane of most of my Ubuntu and Linux experiences; the wireless doesn't work. Annoyingly Apple changed the provider of their wireless chipsets to Broadcom which doesn't at all help the Linux community. I tried compiling some drivers, using Ndiswrapper and some other tools but still no success. Overall the experience was good but back to Vista till this problem is fixed.

Sunday 3 August 2008

My Pictures 3D Helix using WPF (Part 1 of 3)

Now everyone enjoys looking at pictures and reminiscing over good times; myself included however when browsing through My Pictures I thought there has to be a better and more interactive way to do this. This occurred quite luckily around the same time I’ve been working on a project using the 3D abilities of WPF, and so it occurred to me; a 3D method of viewing your images while also discussing what it’s like to develop software at Microsoft. So now, let’s get stuck in and make something amazing...

So first of all I should mention that I’ll be using the combination of C# and WPF to create this application, if you’ve never coded in C# then now is a good time to learn and I’ll try my best to make what I do as easy to understand as possible. Therefore, head over to http://www.microsoft.com/express/download/ and grab yourself a copy of Visual C# Express Edition that is entirely free to use.

Now the first thing you will need to do is create a new WPF application that we can build from; for this project I called it StudentZine_Helix, you will instantly notice that building a WPF application is quite different from the old WinForms method of building an application. Firstly there is something called Xaml which you can use to construct the user interface and possibly the entire application however for this project we will still mainly need to stick with code.

When we write code here at good old Microsoft, we tend to have an end goal in mind, a set of requirements and repeated testing to eliminate bugs... so quite different to thinking ‘I want to make something shiny’ and writing the code for the final app of this series over my lunch break. Normally we also work in teams so we can gain feedback and reflect off the skills and resources of others.

When you first make a WPF application you will be greeted by the xaml editor and design view, to start off with its a boring white window so let’s make it larger and also a different colour. To do this we need to alter the xaml attributes for the windows Title, Height, Width and add the Background property, the attribute properties I used were the following:

Don’t worry if you need to make the window smaller, everything scales nicely.
In order to view all the images in the My Pictures folder we will first need to get a list of all the files. We can do this by using DirectoryInfo to return a list of all the files in the folder; however, we’ll then need to strip away all the ones that are not valid image types, thus leaving us with a usable list of filenames.
So now, go into the C# code view and at the top of the code declare the namespace:


Then in the window’s class, declare a list of strings that will represent the image file extensions we will allow to be loaded in the application:

I have already populated with three of the most common image formats to use however, you can add or remove them depending on what you want. Now at the same time declare another list of strings for the final list of filenames:


In the code for the function to retrieve the filenames we firstly use DirectoryInfo to get information about the directory from which we can extract the list of files, we use System.Environment.GetFolderPath(System.Environment.SpecialFolder.MyPictures) to return the path of the My Pictures folder as it always returns the path of the current user. Using the .GetFiles("*", SearchOption.AllDirectories); method we can return all the files in the directory as all subdirectories; kindly meaning we don’t have to implement a search algorithm ourselves. Finally, we go through each FileInfo and store only the filenames of the correct extension. Below is the source code for the implemented function.

For the moment, let’s just render the first image in the filelist to the screen with a nice border so you can see the code in action.

To make the border and the image we need to add a few UIElement’s to the Grid control that’s declared by default in the xaml file, go back into the xaml file and between the Grid declarations paste the following code:


The first part declares a border control, we give it a margin around it of 20 pixels on each side and the border itself is white and 10 pixels on each side. We set the vertical and horizontal alignment to center so it automatically resizes depending on the size of the picture. Finally we set the Opacity of the border to 0 so it’s transparent to begin with so we can add a cool fade in effect later. Inside the border, we declare an image but we don’t set the source image just yet.
Now back to the C#, we have to create a function to load an image and display it onto the image control we just created, it may seem a bit lacking at the moment but we’ll add to it in a bit.

To wrap this all together by calling these functions when the application loads, so in the class constructor place after InitializeComponent() place the following code.
Now when you run the program you will see... nothing, that’s because the border we declared earlier has an opacity of 0 so we can’t see it. Guess we should add in a fade in effect.
To use animations in WPF you’ll first have to add the following namespace to the project:

We can implement the animation in either xaml or in the code but for this article I’ll show you how to implement it in code. So going back to the last function you just wrote add the following code to the end of it.
So now, finally when you run the application you will see it nicely fade in an image.


The observant of you may notice that’s not 3D or a helix; this week we were laying the groundwork so tune in next time for when I’ll show you how to do 3D effects in WPF.